
Sarees
How to Drape a Saree: The Nivi Style Step by Step
Six metres, ten minutes, no magic: an honest, beginner-friendly guide to the classic Nivi drape — from petticoat and blouse to pleats, pallu and pins.
The most common worry before a first saree is always the same: "I'll never manage this." You will. The Nivi drape — over the left shoulder, with pleats laid at the front — follows a fixed sequence, and once you've done it two or three times it takes under ten minutes. Here it is, step by step.
What to prepare
Three things decide the outcome before the saree even enters the picture. First, the petticoat: it must sit tight at the waist and match the saree's colour, because it carries all the weight. Tie the drawstring firmly — a loose petticoat slips, and the whole saree slips with it. Second, the blouse (choli), well-fitting and put on first. Third, the shoes you'll actually wear, flat or heeled — the hem height depends on them. And keep a dozen safety pins within reach. Professionals use them too.
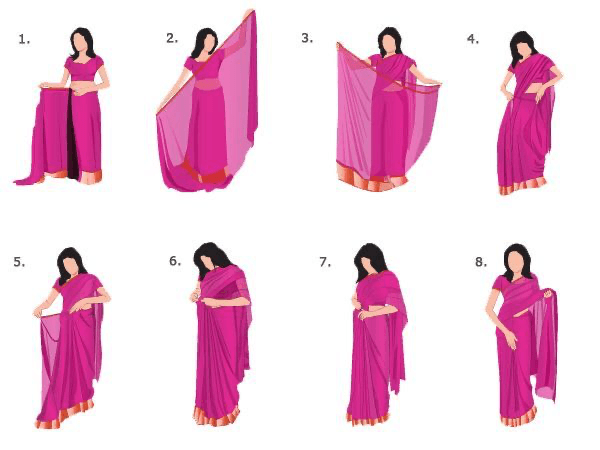
Step 1: Tuck in and the first round
Take the plain end of the saree (not the decorated pallu) and tuck it into the petticoat waistband on your right, about a hand's width below the navel. Carry the fabric once fully around your body back to the left, so the lower edge just grazes the floor. This first layer is your foundation — it should sit smooth, not pull tight.
Step 2: Bring the pallu over the shoulder
Now decide how long the pallu — the decorative end piece — should hang over your left shoulder: usually to about the back of the knee. Gather the width of the pallu into loose lengthwise pleats, throw it over the left shoulder to the back, and pin it to the blouse at shoulder height. This takes the strain off the pleats that come next and holds the pallu in place.
Step 3: Lay the front pleats
This is the heart of it. Take the remaining fabric in front of you and fold it into five to seven equal pleats (about 12–15 cm each), all falling the same way. Hold the pleats together at the top, line up the lower edges evenly, and tuck the bundle into the waistband at centre — angled slightly to the left. A safety pin through the bundle holds it all together. Beginner's tip: measure each pleat against your outstretched index finger and they'll come out even.
Step 4: Secure, check, walk
Pin the pallu a second time if you like, check in the mirror that the hem falls level all the way round, and take a test step. If something sits crooked, undo only that one pin — not everything. For a long evening, one pin too many beats a slipping pallu.
When it won't behave: we'll help
The first few times it's allowed to look uneven — that's part of it. If a written guide isn't enough, message us on Instagram (@tuli_germany) or book a short video call and we'll drape it together. And if you simply lack the practice, a pre-pleated "ready-to-wear" saree isn't cheating — it's a fine place to start.
Frequently asked questions
How many safety pins do I need for a saree?+
Usually two to four are enough: one in the pleat bundle, one or two at the pallu on the shoulder, and perhaps one holding the pallu in front. It is entirely normal and not cheating.
Which way does the Nivi drape go?+
The first round wraps from right to left around the body, the pleats angle slightly left, and the pallu falls over the left shoulder to the back. This keeps your right side free to move.
How do I keep the saree from slipping?+
It all rests on the petticoat: it must sit tight at the waist and be firmly tied. Tuck the fabric in deep and secure, and pin the pleats and pallu. A well-fitting petticoat is half the battle.
Is there a saree you don't have to drape?+
Yes — pre-pleated \"ready-to-wear\" sarees come with the pleats already laid and the pallu attached, and go on like a skirt. A good entry point until free draping feels natural. Just ask us about suitable pieces.
From the collection